Contact Form – Connection with Customers
A contact address on a website is one of the basic conditions of a respectable looking company presentation. However, through inPage your customers will get another option of contacting you: a contact form.
Opinions on the usefulness of a contact form on websites vary. The truth is that you can see it on a lot of websites. A contact form enables you to hide your email address. The message from the form will be delivered there but a website reader won't see it. It will also stay hidden from automatic robots which collect email addresses to send spam to later.
Nevertheless, the idea that the contact form will fully protect you against spam is wrong. It will only filter the attempts of simple robots. The more sophisticated ones can send junk mail through contact forms on websites as well. So the main advantage of the form is the comfort it offers to the visitors of your website. They can decide whether to open an email reader or webpage and send you an email or whether theyd will write their message directly on the contact form.
Creating a Contact Form
Open the administration interface inPage, go to the Settings section and switch to the Form Settings item. In the popup menu called Add item to form you can gradually choose items from which you want to create your contact form. If a box on the form should be mandatory, set it up before adding through the option required. Only then click on the button Add.
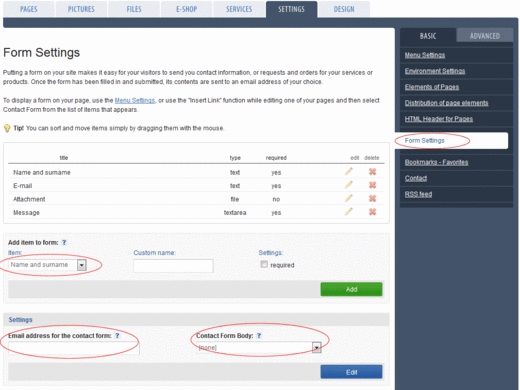
It doesn't matter if you add items to the form in a different order to how you want them displayed. This order can be changed with the up and down arrows. Besides the usual boxes such as name and surname, e-mail, company, telephone etc., remember to add the box Message to your contact form. This is where website visitors will be able to write their message.
Once the form is put together, add the email address to which you want the content of the form to be sent. A very interesting setting is the Body of contact form item. If you want any other items around the form, you can prepare a normal page in advance, set it as inactive and choose it here. The contact form will then contain this page.
Save the contact form settings by clicking the green Edit button.
Making the Form Available
Making the Form Available
Now the form is ready but it is not displayed on the website. To achieve that you only need to do one thing: add it to the menu. Go to the bookmark Setting, Menu setting, choose Links as your source and in the box Link to choose Contact form. Then click on Add and the contact form will be shown in the main menu of the website.

Your contact form is now ready.
Add comment
Comments - Overview