How to Add a Photo Gallery to Article
Adding a photo gallery to an article can be done in a lot of cases, for example if on your website you want to display an overview of products with descriptions and add a photo gallery with a number of pictures to them.
If you already know how to create photo galleries and upload pictures into them, then you will welcome the option of adding a photo gallery to a specific article. The photo gallery will then appear on the website at the end of the page to which you have added it.
An added photo gallery will help you liven up your website.
To be able to add a photo gallery to an article, two conditions have to be fulfilled. The photo gallery has to be set up as active and it has to contain at least one active picture.
Steps for Adding a Photo Gallery to Article
Photo gallery is created in inPage Administration in the section PICTURES. To add a photo gallery to an article you have to go to the administration section PAGES. In the overview of articles created, click on the pencil next to the article you want to add the photo gallery to (see picture).

You will find the "add a photo gallery" function in the Settings section. Display it now (see picture below):
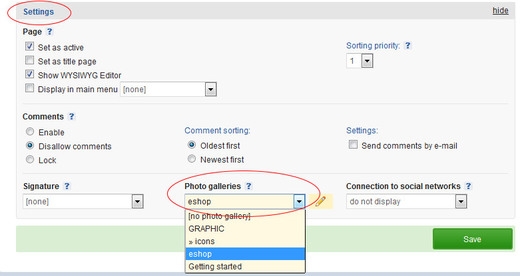
In the Settings section there is a bookmark called Photo gallery. Here, choose a photo gallery which you want to add to the article from the scrollbar.
Once you have chosen the photo gallery, finish off with confirmation of the changes using the green button Save.
Example of a photo gallery added to an article.


Add comment
Comments - Overview